Friday 18 July 2014

Air fryer eggless chocolate banana bread pudding

This is rather similar to the apple raisin bread pudding recipe, except this time I was lazy and didn't put the crumble on top. I woke up at 6am to make it. The preparation cum cooking was so fast, so while it was cooking I got ready for work. And then I even got a chance to sit down with Lucas to eat it before leaving for work. 
Yummy!


Recipe adapted from http://www.vegan.com/recipes/vegancom-top-10-recipes-of-2008/banana-chocolate-chip-bread-pudding-vegancom-top-10-recipe-2008/

Makes 4 soufflé cup and 1 6-inch round cake pan

INGREDIENTS:
6 cups 1″ cubed bread
1/2 cup chocolate chips
2 ripe bananas, sliced ½” thick
1.5 cups unsweeten soy milk (can add more if bread pudding looks too dry)
2 teaspoons corn starch 
½ cup honey
1 teaspoon vanilla extract
½ teaspoon cinnamon


DIRECTIONS:

1) Grease a 6-inch round pan or your soufflé cups with oil or butter. 

2) Place cubed bread in a large bowl.

3) In a small bowl whisk together ½ cup soy milk and the corn flourtill no lumps remain.

4) Add remaining soy milk, honey, vanilla and cinnamon and whisk to combine. 

5) Pour over cubed bread and stir to coat every piece. 

6) Now, preheat Airfryer to 170 degree Celsius.

7) Allow bread mixture to sit for at least 15 minutes for liquid to soak into bread. Depending on what kind of bread you use and how stale it is, add more soy milk (¼ cup at a time) and allow more soaking time till every piece of bread is saturated and there’s a little bit of extra liquid. Mixture should look mushy and wet. 

8) Fold in chocolate chips and bananas 


9) Pour mixture into pan or soufflé cups, patting down to make an even top.


10) Bake 18 minutes till top is puffed, slightly browned and feels firm. 


Taste is good! But some of it stuck to the sides and some top parts were hard. Perhaps try a shorter timing or lower temp next time. 

Thursday 10 July 2014

Bad recipes

Bad recipes keep you awake for a long time with no satisfaction. 

Like now. 

The muffins looked so great on this person's blog. So I tried it and it was a disaster. Takes forever to cook. And then it's hard as rock. And too sweet. 
The batch is not small and so I spent 3 rounds of experiments on the temperature and timing but all seems to no avail. 
And now I have 11 hard uncooked overly sweet muffins that I need to think of how to get rid of. 
And it's 12.05am! What a disastrous thereupeutic baking session! 

Well at least I snapped some pictures and learned how to make them look delicious when they are not. Don't say you have not been warned. 


Sunday with Lucas

Last Sunday my husband had to work at the last minute. It was our helper's off day so I needed my mil's help. In the end the arrangement was that I leave Luis at her house while I bring Lucas home for swimming and nap. 

So for the first time since Luis was born, Lucas and I had time alone together. This was different from the times I brought him to Heguru classes or went to fetch my husband together. There was no rush element. 

I brought him swimming and then we went home for a nap. It was just us. And when he woke up we lazed on the bed for a while. 

I miss enjoying alone time with Lucas. It brought back memories and feelings of the times before Luis was born. Many times during Sundays it was only Lucas and me, and we spent a lot of time together. All my attention was on him and there was nothing else to rush to. 

So unexpectedly, my husband being called back to work at the last minute turned into a rather nostalgic Sunday for me. Mummy love you baby... Always remember that. 

Wednesday 9 July 2014

Air fryer healthy carrot cake with cream cheese frosting

By now it should be quite clear that I like recipes that are as healthy as possible while still being tasty. When I first found out there is such a thing as carrot cake, not the Singapore hawker stir-fried savoury type, I was skeptical. How good can it be... it's a vegetable cake!
However during my second pregnancy, I began to like this cake very much and even until now. I like that it's healthy and the cream cheese is literally the 'icing on the cake'. No carrot cake can do without the cream cheese!
I searched online and to my disappointment, many of the carrot cake recipes were not healthy at all. The cake can contain 2 cups of sugar! And the cream cheese another 2 cups!
But there were also many others who really wanted healthy versions and so I combined 3 recipes that I found, with some adaptations of my own, and here goes.
The end result: the cake's taste has too much cinammon (so I reduced it in the recipe below) but still overall it's tasty and moist. The sugar still can be reduced (so I did in the recipe below). The cream cheese has a nice light tangy taste.
According to my husband, it's good but not sweet enough commercially. So I shall take that as a compliment!

Seriously, if you like carrot cake you have got to try this!


Makes two 6-inch cakes.


INGREDIENTS

Carrot cake:
  • 2 cups all-purpose flour
  • 2 tsp baking soda
  • 1/2 tsp salt
  • 1 1/2 tsp cinnamon
  • 3 eggs at room temp
  • 1/3 cup sugar (can convert this to honey for a healthier alternative)
  • 1/4 cup honey
  • Less than 3/4 cup sunflower oil (I used 3/4 cup and found it too oily)
  • 2 tsp vanilla essence
  • 1/2 cup applesauce
  • 1/4 cup plain yoghurt
  • 2.5 cups shredded carrots (~2 sticks)
  • 1/2 cup raisins
  • 1/2 cup walnuts
Cream cheese frosting:
  • 8 oz cream cheese
  • 1 cup icing sugar (can try honey instead too)
  • 1/2 cup plain yoghurt
  • 1 tsp vanilla essence
  • 1 tbsp lemon juice for a tangy taste (optional)
HOW

Before starting take cream cheese out from fridge.

Carrot cake:

1) Grease baking tray and line bottom with paper.


2) In a medium bowl, sift together all purpose flour, baking soda, cinnamon and salt, set aside.


3) In a large bowl with a handheld mixer on medium speed, combine the sugar/honey and oil. Beat in the yogurt and apple sauce until fully combined - about 1 minute. Mixture will be gritty and thin.
(I used a hand whisk so just beat slightly longer)


4) Add the eggs, one at a time, beating well after each addition. Mix in the vanilla.


5) Preheat Airfryer at 175 deg C for 10 min.


6) With a spatula, manually stir the wet ingredients into the dry ingredients until just combined and all flour pockets are gone - do not overmix.


6) Fold in the finely shredded carrots,  raisins, and walnuts.


7) Pour into prepared pan and in the Airfryer. Cover loosely with aluminium foil. 
Bake at 175 deg C for 30 minutes. (I tried 175 deg C for 25 min with no foil and it was burnt on top and not cooked inside. Then I added 5 more min at 160 deg C and it was ok).
 

8) Remove and cool. If the top part is burnt, cut it off. Unfortunately mine was burnt :(


Cream cheese frosting:

1) In a food processor(or with hand beaters) beat the cream cheese until soft.

note: this step is very important to do before adding anything else if not you will get lumpy frosting.

2) Add the icing sugar a little at a time and cream till it's not visible, then repeat. Do the same with the yogurt.

3) Then add vanilla and lemon juice and beat until completely smooth.

3) Pour into a container, cover and chill until ready to frost (frosting will thicken in the fridge after a couple hours).


Finally:

1) Cut cooled cake into 2 layers, add frosting to 1 layer and add frosting on top and side. Top with walnut.

2) Chill in fridge before serving.


Sunday 6 July 2014

Rich and healthy steamed chocolate banana cake

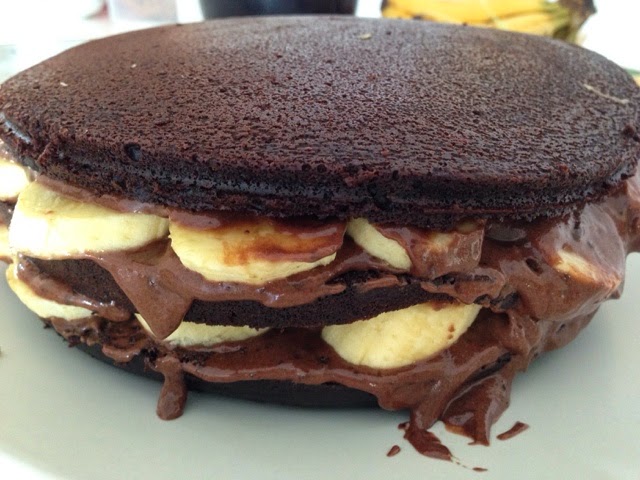
Usually when I tell people that this cake is steamed they find it hard to believe because the taste is rich. I also don't like it to be too sweet so perhaps that's why you can taste the chocolate and banana more. Overall it's rather good! You know how some people say, "I'll just try a little, I'm full". This cake is tastes good yet healthy enough to get them to take a second helping.

I find that it tastes almost professional - but less sweet and less pretty, but that you can improve, or at least I can improve! You can also camouflage bad forsting skills with toppings.

Try it!


&
The Baking Biatch

Makes one 7.5 inches (19cm) cake.

FOR CAKE:
180ml sunflower oil (or butter)
150g brown sugar
200 low fat milk (or evaporated milk)
1 tsp vanilla essence

2 eggs, slightly beaten with fork

100g plain flour
50g cocoa powder
1/2 tsp baking powder
1/2 tsp baking soda

Method :
1. Combine sugar, milk, vanilla essence and oil in a saucepan.Stir over low heat until sugar is dissolved (and butter is melted), turn off the fire and keep warm. 

2. Add the beaten eggs into the slightly cooled milk mixture and stir till well mix.

3. Sift the flour, cocoa powder, baking powder and baking soda into a large mixing bowl, then pour the egg mixture over the flour and stir till well mix. Cake batter should be runny. Be careful not to over mix else it may be dense later. 

4. Heat up a wok with water at med heat. 

5. Pour the batter into the pan and place the pan into the steamer and cover the top of the pan loosely with a piece of aluminium foil (to prevent condensation from steam to fall onto cake)


7. Steam over med heat for 40 mins. (until skewer came out clean). 
Note: Don't steam too long else it becomes dense. Don't use high heat else top will 'huat'. 

8. Cool the cake in pan before turning it out for cutting. 

FOR FROSTING:
250g whipping cream (both dairy and non-dairy works well)
250g dark couverture chocolate
3-4 bananas

Method:
1) Melt the 250g of couverture chocolate in the microwave (on 1 minute intervals, medium setting) or double boiler till it is shiny. Stir well and allow it to cool down for 5 minutes.

2) Whisk up the whipping cream (250g) to stiff peaks. 
Note: stiff peaks won't fall when you overturn the bowl. It's possible! And if you draw across it you should be able to see the tracks. 

3) Add the chocolate into the whipping cream and stir well with a spatula.
If frosting seems too runny, let it cool before application. 


COMBINE cake and frosting:
1) Cut cooled cake into 3 even layers

2) Spread frosting on one layer, add bananas and spread frosting again


3) Top with one layer of cake

4) Repeat till 3 layers are stacked

5) Then frost whole cake - i.e. the top and side

Chill cake in fridge while preparing ganache. 

FOR GANACHE:
200g dark couverture chocolate
80ml whipping cream (both dairy and non-dairy works well)
3/5 tbsp unsalted butter

Method:
1) Melt the 200g of couverture chocolate in the microwave (on 1 minute intervals, medium setting) or double boiler till it is shiny. 

2) Add the whipping cream and heat it up for another 2 minutes.

3) Add the butter. Stir well. If your mixture is still chunky, pop it back into the microwave oven (medium setting) on 1 minute intervals to have it all melted. 

Allow it to cool for about 10 minutes before applying on the cake. Cool until it is not runny so it's easy to apply). 


Notes:
Batter made with butter was less runny and also cake was a little dense, in fact hard after refrigeration. Suggest to stick to oil. But be careful not to break cake when cutting for layering else cake will overflow to side when bananas and frosting are added. 

To prevent dense cake, do not over mix to prevent dense cake and water should be boiling on med heat during steaming. 

If there are too many air bubbles, tap the tin to break the bubbles or drop it a few times on tabletop before steaming.

Hershey's choc chips are not the same as couverture. Hershey's gives much air bubbles which you don't see with couvertures. And Hershey's takes much longer to melt than couverture. Taste will be ok but a lot of air bubbles in the ganache and ugly when applied. 

Frosting too runny is due to whipped cream not achieving stiff peaks. Really overturn the bowl to check that cream will not drop.

If you accidentally broke your cake during layering, don't fret! Do not try to stuff the cake and filling back, they will just flow out. Finish your layering and frosting, put the cake in the fridge for at least 30min then take it out and cut out the excess to achieve a round shape.

Cut cake (before frosting and before eating) with bread knife. You can get very clean cuts.

This amount of frosting and ganache will give you a little leftover. If don't want leftovers, try to cut by 20ml/g. 

Friday 4 July 2014

Closing the chapter on baby years

Three days ago I expressed the last bottle of milk for my second son.

I breastfed my elder son for 1 year and my second son for 1.5 years. Subconsciously these years of breastfeeding and expressing milk got associated with many emotions and memories.

Joy...
the depth of the emotional attachment that forms between your baby and you when he snuggles up and latches on for milk simply cannot be described adequately with words. With Luis he went fully onto the bottle around 6 months old after I haven't been regularly latching him. It was rather sad for me because I truly believe that this helps in forming a strong bond between you and your child.

Assurance...
that your baby will not fall sick. Lucas never went to the doctor due to falling sick during the year he was on breastmilk. Luis was not as lucky, probably due to the presence of an elder sibling at home who constantly contributes viruses and bacteria to his immunity building.

Me time...
Whenever I express milk I have at least 30 minutes to myself where I am not expected to do anything except engage in the noble act of producing supreme virus/bacteria-fighting milk for the defenseless baby. Especially for the after-work 'shift', I get to wind down and sit on the bed and watch my favourite Grey's Anatomy or Modern Family. For 30 minutes, I get some enjoyment.

On the other hand, monumental stress and fatigue...
Ok maybe an exaggeration. But looking back, I am impressed how I managed to get through those times. There were two particularly challenging ones for me.

One, at night. When it is 11pm and my eyelids and body are telling me to go to sleep, it takes enormous energy to sit up and express milk. Many times when I am done it is so late that my husband is already asleep.

Two, during travelling. When you have to travel for a week or more to Europe, with long plane rides and meetings, you have to plan at which time do you want to express milk, in the airport toilet or in the airplane toilet. When in the airplane toilet, at which time so that there is not a long queue outside the toilet. When in meetings, how to tell your colleagues or suppliers that you need time to express milk. And all the intervals between expressing milk needs to be within certain window period so that the milk supply does not drop.

When I stopped breastfeeding Lucas it was because I wanted to have a second child. I remember feeling not ready to let go. But I did it anyhow.

When I reached the 1-year mark with Luis, I was not ready to let go too. It has become a way of life even though it can be tiring at times. Many times. But gradually I cut down, guided by how ready I feel.
When I decided a week ago to stop entirely, it was because I felt that the 30minutes I take in the evening to express milk can be put to better quality time spent with the children. I was also kind of tired. I thought I was ready.

Surprisingly I was a little sad. When I packed my pump to give to my friend, the pang of sadness hit me again. It felt like a chapter of my life has closed and it is time to move on. I think many mothers would feel relieved to stop breastfeeding and I can understand that. What I feel is probably because I am a nostalgic person. Without realising it the long breastfeeding period have subconsciously planted many memories and emotions in my mind.
Also I have always wanted to have one more child so I am reluctant to close this baby chapter in my life. I guess this will always be my small regret. But how can I complain when I have two beautiful children? Sounds so cliche... but it's true, we all have to learn to appreciate what we have.

So bye bye breast pump... bye bye baby chapter... you are but an inanimate object but you have been a part of an important milestone in my life.


Dorayaki pancake with red bean filling

Each time I make red bean paste I end up with more than what I need. So I had to think of something to do with them. This time I thought of this pancake. Usually I do not buy them from the bakery but it seems quite neat to have homemade Dorayaki pancake. Sounds so professional! So I googled and found that they are not difficult at all yet it can make you seem like such a pro! The challenge here is to make perfect circles, the trick is to pour the batter into the pan from a good height. I keep forgetting to do this and my pan is not horizontal so they flow out of shape to become ovals. So take note and don't repeat my mistake!


Makes ~8 Dorayaki sandwiches (i.e.16 pancakes)

Adapted from justonecookbook, I so love Nami's recipes!
http://www.justonecookbook.com/recipes/dorayaki-japanese-red-bean-pancake/

Ingredients:
 
For the pancakes:
4 large eggs
1/2 cup sugar
2 Tbsp. honey
1 cup all-purpose flour
1 tsp. baking powder
 
For the filling:
1 bowl homemade red bean paste
Or you can use ready-made red bean paste for an easy fix
Or just use Nutella for a lazy fix!
 
How:
 
1) In a large bowl, combine eggs, sugar, and honey and whisk well until the mixture becomes fluffy. Takes about 5 minutes.


2) Sift flour and baking powder into the bowl and mix just until all ingredients are incorporated. Do not overmix so as not to work up the gluten else pancakes will become tough but do make sure there are no flour left. Keep in the fridge to rest for 15-30 minutes.


3) When you remove the batter from the fridge, check the batter consistency. It should be a little bit thicker than pancake batter, like heavy cream. If the batter is too thin, pancakes will be too flat and not fluffy.
If you have no idea what I am talking about (I also don't know because I don't make pancakes!) then just leave it as it is. I did.
If you fry one and it doesn't seem like what you like, add 1 tablespoon of water to the batter and try again.
 
4) Heat up a non-stick pan at low heat. Non-stick is important else your pancake will stick to the pan.
 
Important note:
This step really depends on your stove and your pan. Just try what works for you, you may have to waste your first 2-3 pancakes.
  • Some recipes recommend med heat but for my stove this was too hot and burnt the pancake within seconds. So I turned down to low heat.
  •  
  • Some recipes also recommend greasing the pan with little oil using a paper towel. The oil should be on the pan but not visible then you will get the smooth texture on the pancake. But for my pan no matter how little oil I grease I still get small bubbles and holes on the pancake so I did not grease at all and it turned out fine.
5) Make sure your pan is horizontal so the batter won't flow to one side. With a ladle, drop the batter from 6" (15 cm) above the pan to create 3" (8 cm) diameter pancakes.
 
6) When you see the surface of the batter start to bubble, flip over and cook the other side. You will need to 'dig' a little under the pancake with quick short motions to unstick it.
 
 
When you see this, flip over.
Note: You need a thin spatula for this.
7) The other side is so nice... Remove from pan after about a minute.


8) Before you fry the next one, use a paper towel to clean remainder batter from pan. Repeat this each time before frying the next one.
 
9) When you are done, add a generous amount of filling on one side of the pancake (the non-smooth side) and slap on one more to make your sandwich.
 
Your filling should be more moist than this.

10) If you are not eating immediately, wrap with cling wrap. Try to eat within the next day so that they don't have to go into the fridge. I find that the red bean gets dry even with the cling wrap if they go into the fridge.

Enjoy!


Steamed chocolate cupcake with chocolate ganache

I had chocolate ganache left from making a chocolate banana cake, so I freezed it. It has been one month so I thought I better use it before it can't be eaten anymore. 
For a different variation, you can fold in 8 tablespoons of chocolate chips as the last step instead of the ganache. 


I used only 3 tablespoons of chocolate powder for this. You should try 4 tablespoons for a darker more appetizing colour.

Adapted this recipe from Yoyo's kitchen adventures:

Makes ~8 silicon cup cakes

Ingredients:
1 cup all-purpose flour
2 tsp baking powder
4 tbsp cocoa powder
2 eggs
7 tbsp plain yoghurt
2 tbsp sugar
4 tbsp vegetable oil
Chocolate ganache for filling OR 8 tbsp chocolate chips for folding in

HOW:
 
1) Fill a steamer with water and bring it to boil at med-high heat. 
 
2) Sift the flour, cocoa powder and baking powder in a large bowl.
 
3) In a separate bowl, whisk the egg, sugar, yoghurt and vegetable oil together.
 
4) Add the egg mixture to the flour mixture and mix them together well without introducing too much air. Aim for less than 15 strokes and make sure there are no flour patches left. If you need more strokes, do it but at the end drop the bowl a few times on the tabletop to get rid of air bubbles. 
 
5) Fill each cupcake holder with 1 tablespoon of batter, add ganache, then top with 1 tablespoon of batter. 


If you are using chocolate chips instead of ganache, fold in the chips with a spatula.  
6) Place the cupcake holders in the  wok, cover loosely with aluminium foil. Put on the lid and steam at med-high heat for 8 minutes.

 
7) The cupcakes are cooked when a skewer comes out clean.