Showing posts with label chocolate. Show all posts

Thursday, 25 June 2015

Soft and chewy chocolate chip cookies

First post 20th June 2015 Saturday
Edit 11th September 2015 Saturday:


KP bought a microwave oven when our toaster oven was spoilt. I've been meaning to try baking cookies with it. One day I came back from work early (left around 6pm) and we were done with dinner and stuff before 8pm. So I made cookies. 

This recipe I found is really fantastic. It's simple and delicious. I decreased the sugar but it was still a tad too sweet for my taste. The temperature was a total disaster in my case. In the end I tweaked it to 200 deg C for 20 minutes. Pretty sure if it were lower it would be more soft and chewy, but I was impatient by the time the first batch was finally done that I just want to make it quick. 
I thought it was not very good and almost didn't want to document it but a few people said it's nice. So here goes. 
Edit: below is the recipe with less sugar and it still tastes pretty good. I also did it at 180 deg C for 20 min. 
Next time I'll try with oil as substitute for the butter. 

Original recipe from:
http://allrecipes.co.uk/recipe/32688/the-best-soft-and-chewy-chocolate-chip-cookies.aspx

INGREDIENTS:
Makes 18 big cookies

- 70g castor sugar
- 70g brown sugar
- 125g butter, melted

- 1 egg beaten
- 1 tsp vanilla essence (optional)

- 225g self-raising flour
- 100g chocolate chips

METHOD:
  • Preheat the microwave oven to 200 deg C. 
  • Using a hand mixer blender (I used the Philips brand and the zigzag blade), cream the sugars and the butter together until pale and smooth. Just a minute or so, stop when it's well combined. 


  • Add the egg and vanilla essence, but don't over-mix as it may curdle the mixture.

  • Transfer mixture to a big mixing bowl and add the flour and mix in three batches. You can use the fold in method with a fork. 


  • Fold in the chocolate chips. 
  • The dough should be quite sticky. Place blobs of mixture on the prepared baking trays.
  • Bake in the preheated oven at 180deg C for 20 minutes. 
  • After the time is up, it will be very soft and still a little sticky on the baking sheet. Remove the cookies and place on a wire rack to cool down. It will get harder and the form will set. 

    Next tries:
    - Use 1/2 cup oil with abit of salt instead of butter. 

    Note:
    - Original temp and time in source recipe is 180 deg C for 8 min.

  • Tuesday, 12 August 2014

    Air fryer chocolate chip muffins

    Ever since I brought my iPhone swimming and it didn't recover, I have lost interest in using my phone. Emotionally my iPhone is related to my baking, so no iphone made me less interested in baking.
    But I was craving for something sweet, so I baked these on a Saturday afternoon with 1 hour before the boys' Heguru class.
    Yummy! The chocolate rice on top makes it even better because it adds some crunch, but does not look so nice. Perhaps next time scoop the batter in a more rounded form before adding.


    Makes 8-9 silicon cup small muffins
     
    INGREDIENTS:
    1 1/2 cups all purpose flour
    1/4 cup sugar
    1/2 tsp salt
    2 tsp baking powder
    1/3 cup vegetable oil
    1 egg
    Top up with yoghurt to 1 cup
    2 tsp vanilla extract
    1/2 cup mini chocolate chips
    Sprinkle of chocolate rice (optional, if you do this you can reduce the mini chocolate chips)

    HOW:

    1) Combine flour, sugar, salt, baking powder in one large bowl. Whisk well to ensure even spreading of salt and baking powder. 

    2) In a separate cup, pour oil in. Then add egg. Add yoghurt till full cup. Then add vanilla extract. Whisk till combined. 

    3) Add (2) to (3). Mix just till combined. Aim for less than 15 strokes, it's ok to have some flour visible.

    4) Preheat air fryer at 180 degree Celsius. 

    5) Fold in chocolate chips.


    6) Fill silicon cups 3/4 full (the muffin expands only ever so slightly). If you are sprinkling chocolate rice, make top smooth first before sprinkling.


    7) Bake at 180 degree Celsius for 10 min. If not done, add another 2 min at 160 degree Celsius.


    Friday, 18 July 2014

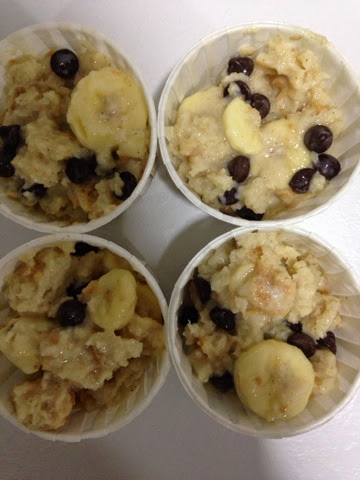
    Air fryer eggless chocolate banana bread pudding

    This is rather similar to the apple raisin bread pudding recipe, except this time I was lazy and didn't put the crumble on top. I woke up at 6am to make it. The preparation cum cooking was so fast, so while it was cooking I got ready for work. And then I even got a chance to sit down with Lucas to eat it before leaving for work. 
    Yummy!


    Recipe adapted from http://www.vegan.com/recipes/vegancom-top-10-recipes-of-2008/banana-chocolate-chip-bread-pudding-vegancom-top-10-recipe-2008/

    Makes 4 soufflé cup and 1 6-inch round cake pan

    INGREDIENTS:
    6 cups 1″ cubed bread
    1/2 cup chocolate chips
    2 ripe bananas, sliced ½” thick
    1.5 cups unsweeten soy milk (can add more if bread pudding looks too dry)
    2 teaspoons corn starch 
    ½ cup honey
    1 teaspoon vanilla extract
    ½ teaspoon cinnamon


    DIRECTIONS:

    1) Grease a 6-inch round pan or your soufflé cups with oil or butter. 

    2) Place cubed bread in a large bowl.

    3) In a small bowl whisk together ½ cup soy milk and the corn flourtill no lumps remain.

    4) Add remaining soy milk, honey, vanilla and cinnamon and whisk to combine. 

    5) Pour over cubed bread and stir to coat every piece. 

    6) Now, preheat Airfryer to 170 degree Celsius.

    7) Allow bread mixture to sit for at least 15 minutes for liquid to soak into bread. Depending on what kind of bread you use and how stale it is, add more soy milk (¼ cup at a time) and allow more soaking time till every piece of bread is saturated and there’s a little bit of extra liquid. Mixture should look mushy and wet. 

    8) Fold in chocolate chips and bananas 


    9) Pour mixture into pan or soufflé cups, patting down to make an even top.


    10) Bake 18 minutes till top is puffed, slightly browned and feels firm. 


    Taste is good! But some of it stuck to the sides and some top parts were hard. Perhaps try a shorter timing or lower temp next time. 

    Sunday, 6 July 2014

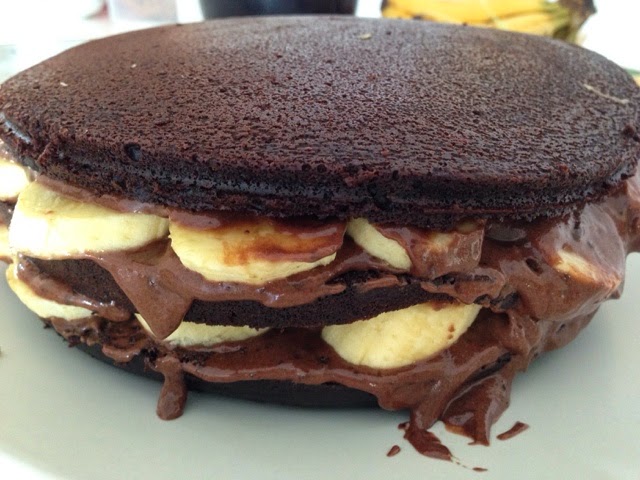
    Rich and healthy steamed chocolate banana cake

    Usually when I tell people that this cake is steamed they find it hard to believe because the taste is rich. I also don't like it to be too sweet so perhaps that's why you can taste the chocolate and banana more. Overall it's rather good! You know how some people say, "I'll just try a little, I'm full". This cake is tastes good yet healthy enough to get them to take a second helping.

    I find that it tastes almost professional - but less sweet and less pretty, but that you can improve, or at least I can improve! You can also camouflage bad forsting skills with toppings.

    Try it!


    &
    The Baking Biatch

    Makes one 7.5 inches (19cm) cake.

    FOR CAKE:
    180ml sunflower oil (or butter)
    150g brown sugar
    200 low fat milk (or evaporated milk)
    1 tsp vanilla essence

    2 eggs, slightly beaten with fork

    100g plain flour
    50g cocoa powder
    1/2 tsp baking powder
    1/2 tsp baking soda

    Method :
    1. Combine sugar, milk, vanilla essence and oil in a saucepan.Stir over low heat until sugar is dissolved (and butter is melted), turn off the fire and keep warm. 

    2. Add the beaten eggs into the slightly cooled milk mixture and stir till well mix.

    3. Sift the flour, cocoa powder, baking powder and baking soda into a large mixing bowl, then pour the egg mixture over the flour and stir till well mix. Cake batter should be runny. Be careful not to over mix else it may be dense later. 

    4. Heat up a wok with water at med heat. 

    5. Pour the batter into the pan and place the pan into the steamer and cover the top of the pan loosely with a piece of aluminium foil (to prevent condensation from steam to fall onto cake)


    7. Steam over med heat for 40 mins. (until skewer came out clean). 
    Note: Don't steam too long else it becomes dense. Don't use high heat else top will 'huat'. 

    8. Cool the cake in pan before turning it out for cutting. 

    FOR FROSTING:
    250g whipping cream (both dairy and non-dairy works well)
    250g dark couverture chocolate
    3-4 bananas

    Method:
    1) Melt the 250g of couverture chocolate in the microwave (on 1 minute intervals, medium setting) or double boiler till it is shiny. Stir well and allow it to cool down for 5 minutes.

    2) Whisk up the whipping cream (250g) to stiff peaks. 
    Note: stiff peaks won't fall when you overturn the bowl. It's possible! And if you draw across it you should be able to see the tracks. 

    3) Add the chocolate into the whipping cream and stir well with a spatula.
    If frosting seems too runny, let it cool before application. 


    COMBINE cake and frosting:
    1) Cut cooled cake into 3 even layers

    2) Spread frosting on one layer, add bananas and spread frosting again


    3) Top with one layer of cake

    4) Repeat till 3 layers are stacked

    5) Then frost whole cake - i.e. the top and side

    Chill cake in fridge while preparing ganache. 

    FOR GANACHE:
    200g dark couverture chocolate
    80ml whipping cream (both dairy and non-dairy works well)
    3/5 tbsp unsalted butter

    Method:
    1) Melt the 200g of couverture chocolate in the microwave (on 1 minute intervals, medium setting) or double boiler till it is shiny. 

    2) Add the whipping cream and heat it up for another 2 minutes.

    3) Add the butter. Stir well. If your mixture is still chunky, pop it back into the microwave oven (medium setting) on 1 minute intervals to have it all melted. 

    Allow it to cool for about 10 minutes before applying on the cake. Cool until it is not runny so it's easy to apply). 


    Notes:
    Batter made with butter was less runny and also cake was a little dense, in fact hard after refrigeration. Suggest to stick to oil. But be careful not to break cake when cutting for layering else cake will overflow to side when bananas and frosting are added. 

    To prevent dense cake, do not over mix to prevent dense cake and water should be boiling on med heat during steaming. 

    If there are too many air bubbles, tap the tin to break the bubbles or drop it a few times on tabletop before steaming.

    Hershey's choc chips are not the same as couverture. Hershey's gives much air bubbles which you don't see with couvertures. And Hershey's takes much longer to melt than couverture. Taste will be ok but a lot of air bubbles in the ganache and ugly when applied. 

    Frosting too runny is due to whipped cream not achieving stiff peaks. Really overturn the bowl to check that cream will not drop.

    If you accidentally broke your cake during layering, don't fret! Do not try to stuff the cake and filling back, they will just flow out. Finish your layering and frosting, put the cake in the fridge for at least 30min then take it out and cut out the excess to achieve a round shape.

    Cut cake (before frosting and before eating) with bread knife. You can get very clean cuts.

    This amount of frosting and ganache will give you a little leftover. If don't want leftovers, try to cut by 20ml/g. 

    Friday, 4 July 2014

    Steamed chocolate cupcake with chocolate ganache

    I had chocolate ganache left from making a chocolate banana cake, so I freezed it. It has been one month so I thought I better use it before it can't be eaten anymore. 
    For a different variation, you can fold in 8 tablespoons of chocolate chips as the last step instead of the ganache. 


    I used only 3 tablespoons of chocolate powder for this. You should try 4 tablespoons for a darker more appetizing colour.

    Adapted this recipe from Yoyo's kitchen adventures:

    Makes ~8 silicon cup cakes

    Ingredients:
    1 cup all-purpose flour
    2 tsp baking powder
    4 tbsp cocoa powder
    2 eggs
    7 tbsp plain yoghurt
    2 tbsp sugar
    4 tbsp vegetable oil
    Chocolate ganache for filling OR 8 tbsp chocolate chips for folding in

    HOW:
     
    1) Fill a steamer with water and bring it to boil at med-high heat. 
     
    2) Sift the flour, cocoa powder and baking powder in a large bowl.
     
    3) In a separate bowl, whisk the egg, sugar, yoghurt and vegetable oil together.
     
    4) Add the egg mixture to the flour mixture and mix them together well without introducing too much air. Aim for less than 15 strokes and make sure there are no flour patches left. If you need more strokes, do it but at the end drop the bowl a few times on the tabletop to get rid of air bubbles. 
     
    5) Fill each cupcake holder with 1 tablespoon of batter, add ganache, then top with 1 tablespoon of batter. 


    If you are using chocolate chips instead of ganache, fold in the chips with a spatula.  
    6) Place the cupcake holders in the  wok, cover loosely with aluminium foil. Put on the lid and steam at med-high heat for 8 minutes.

     
    7) The cupcakes are cooked when a skewer comes out clean.