Showing posts with label Steamed. Show all posts

Saturday, 21 February 2015

My mother's famous steamed yam cake

Finally I made the effort to learn how to make it. So two days before CNY in 2015, I took half day leave and requested my mother to show me how. It doesn't look good in the photo, I didn't do it justice. But with fried onion and shrimps, it is soooo damn gooood. 
In this photo you see little craters, that's because Lucas ate all the sausages that were on top of it!

Makes 1 rectangular aluminium tin foil roughly 30 x 15 cm (the type commonly sold in ntuc). Super huge! 

Ingredients 
These are my agar-ations because my mother is never specific when it comes to cooking. 

- Yam, diced, roughly 1kg +/- 200g (1 whole or 3/4 of a big one)
- Mushroom, soaked till soft then diced, 1 rice bowl
- Dried shrimps, 1 rice bowl
- Rice flour, 600g (1 packet)
- Potato starch, 6 soup spoons?
- Garlic, diced, half a rice bowl
- Onion, diced, half a rice bowl
- Salt, 1 soup spoon (yes!)
- Sugar, 1 soup spoon
- MSG, 1 tablespoon (yes!)
- Roughly 3 soup spoons of oil

For garnish and to go with yam cake:
- 1 sausage
- Fried onion and oil
- Fried shrimps

How
1) Heat a very big wok with medium fire, put oil in, fry the following in order (add in one on top of the other, not fry each separately), each one for roughly 30 sec. 
  a) Garlic
  b) Onion
  c) Mushroom
  d) Dried shrimps
  e) Yam

2) Add enough water to cover the ingredients. 

3) Add half a soup spoon of salt, half a soup spoon of sugar and half a tablespoon of MSG. Stir fry some more to mix it. 

4) Cover the wok with the lid and let it simmer on low-med heat. 

5) Using another large bowl, add rice flour, potato starch and half a tablespoon of MSG into it. 

6) Add 7 rice bowls of water. 

7) Mix flour mixture with hand till there are no lumps. Remove sediments if any. 

8) Uncover the wok lid. It should look like this now. Yam should be soft - I.e. can cut with wok ladle. 

9) Add the flour mixture to the wok and mix. 

10) Time to bring out your muscles and mix till you get this. 

11) Switch off the fire. Oil the tin foil and scoop the mixture in. At the top or anywhere in between if it feels too sticky or too difficult to smooth out, add oil. You can be generous with it, cos my mum says 芋头糕没油不好吃的。

12) Garnish with sausages if desired and steam for about 1 hour. 

13) After 1 hour insert a chopstick in. It will be soft but don't worry, it will harden when it cools down. As long as it's not sticky as if it's uncooked it will be fine. 

You can eat it with fried onion, shrimps and sambal shrimp chilli, or you can fry it neat, with egg or with black soya sauce (like frying carrot cake), whatever fancies you. 


Saturday, 2 August 2014

Gula Melaka steamed cupcake

My friend Jesline generously shared this recipe with me about a year ago but I never got down to making it. After I wet and spoilt my handphone I had a sudden craving for it and had to ask for the recipe again. How ironic. Anyhow her recipe is really fantastic, so easy and delicious!
Texture is really like huat kueh, so don't expect cupcake texture.


Makes 7 silicon cups.
 
INGREDIENTS, so wonderfully little!:
Self-raising flour 2.5 cups
Gula Melaka 230g (can reduce to be less sweet)
Water 370ml
 
HOW:
1) Melt the gula melaka in the water over the stove. Use low heat. Remove from stove and cool.
If you have the time, let it cool completely. If not then the flour will be lumpy and not fully mixed, but seems to be no biggy from my first try...
 
2) Add (1) to flour and mix till combined. Do not overmix.
 
3) Steam over high heat (cos' you want them to huat!) for 20min.


Note: in case this thought ever crossed your mind, you CANNOT freeze huat kueh batter. It doesn't huat and you get some hard flat kueh that you don't want to eat. So if you are in a hurry and don't have time to steam your second batch, just make super big sizes in your first batch to finish up all the batter! 
 

Sunday, 6 July 2014

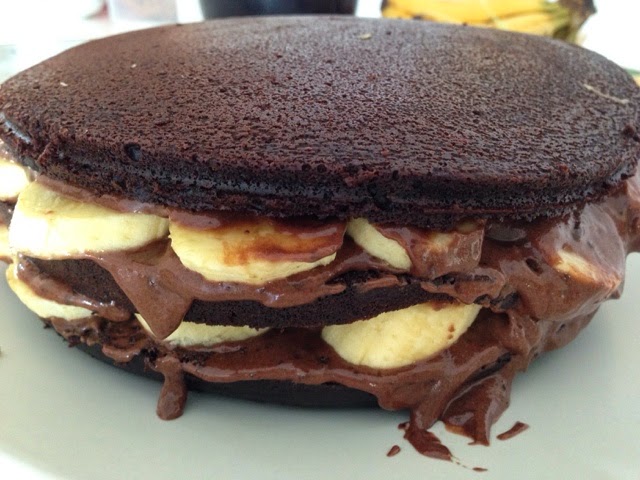
Rich and healthy steamed chocolate banana cake

Usually when I tell people that this cake is steamed they find it hard to believe because the taste is rich. I also don't like it to be too sweet so perhaps that's why you can taste the chocolate and banana more. Overall it's rather good! You know how some people say, "I'll just try a little, I'm full". This cake is tastes good yet healthy enough to get them to take a second helping.

I find that it tastes almost professional - but less sweet and less pretty, but that you can improve, or at least I can improve! You can also camouflage bad forsting skills with toppings.

Try it!


&
The Baking Biatch

Makes one 7.5 inches (19cm) cake.

FOR CAKE:
180ml sunflower oil (or butter)
150g brown sugar
200 low fat milk (or evaporated milk)
1 tsp vanilla essence

2 eggs, slightly beaten with fork

100g plain flour
50g cocoa powder
1/2 tsp baking powder
1/2 tsp baking soda

Method :
1. Combine sugar, milk, vanilla essence and oil in a saucepan.Stir over low heat until sugar is dissolved (and butter is melted), turn off the fire and keep warm. 

2. Add the beaten eggs into the slightly cooled milk mixture and stir till well mix.

3. Sift the flour, cocoa powder, baking powder and baking soda into a large mixing bowl, then pour the egg mixture over the flour and stir till well mix. Cake batter should be runny. Be careful not to over mix else it may be dense later. 

4. Heat up a wok with water at med heat. 

5. Pour the batter into the pan and place the pan into the steamer and cover the top of the pan loosely with a piece of aluminium foil (to prevent condensation from steam to fall onto cake)


7. Steam over med heat for 40 mins. (until skewer came out clean). 
Note: Don't steam too long else it becomes dense. Don't use high heat else top will 'huat'. 

8. Cool the cake in pan before turning it out for cutting. 

FOR FROSTING:
250g whipping cream (both dairy and non-dairy works well)
250g dark couverture chocolate
3-4 bananas

Method:
1) Melt the 250g of couverture chocolate in the microwave (on 1 minute intervals, medium setting) or double boiler till it is shiny. Stir well and allow it to cool down for 5 minutes.

2) Whisk up the whipping cream (250g) to stiff peaks. 
Note: stiff peaks won't fall when you overturn the bowl. It's possible! And if you draw across it you should be able to see the tracks. 

3) Add the chocolate into the whipping cream and stir well with a spatula.
If frosting seems too runny, let it cool before application. 


COMBINE cake and frosting:
1) Cut cooled cake into 3 even layers

2) Spread frosting on one layer, add bananas and spread frosting again


3) Top with one layer of cake

4) Repeat till 3 layers are stacked

5) Then frost whole cake - i.e. the top and side

Chill cake in fridge while preparing ganache. 

FOR GANACHE:
200g dark couverture chocolate
80ml whipping cream (both dairy and non-dairy works well)
3/5 tbsp unsalted butter

Method:
1) Melt the 200g of couverture chocolate in the microwave (on 1 minute intervals, medium setting) or double boiler till it is shiny. 

2) Add the whipping cream and heat it up for another 2 minutes.

3) Add the butter. Stir well. If your mixture is still chunky, pop it back into the microwave oven (medium setting) on 1 minute intervals to have it all melted. 

Allow it to cool for about 10 minutes before applying on the cake. Cool until it is not runny so it's easy to apply). 


Notes:
Batter made with butter was less runny and also cake was a little dense, in fact hard after refrigeration. Suggest to stick to oil. But be careful not to break cake when cutting for layering else cake will overflow to side when bananas and frosting are added. 

To prevent dense cake, do not over mix to prevent dense cake and water should be boiling on med heat during steaming. 

If there are too many air bubbles, tap the tin to break the bubbles or drop it a few times on tabletop before steaming.

Hershey's choc chips are not the same as couverture. Hershey's gives much air bubbles which you don't see with couvertures. And Hershey's takes much longer to melt than couverture. Taste will be ok but a lot of air bubbles in the ganache and ugly when applied. 

Frosting too runny is due to whipped cream not achieving stiff peaks. Really overturn the bowl to check that cream will not drop.

If you accidentally broke your cake during layering, don't fret! Do not try to stuff the cake and filling back, they will just flow out. Finish your layering and frosting, put the cake in the fridge for at least 30min then take it out and cut out the excess to achieve a round shape.

Cut cake (before frosting and before eating) with bread knife. You can get very clean cuts.

This amount of frosting and ganache will give you a little leftover. If don't want leftovers, try to cut by 20ml/g. 

Friday, 4 July 2014

Steamed chocolate cupcake with chocolate ganache

I had chocolate ganache left from making a chocolate banana cake, so I freezed it. It has been one month so I thought I better use it before it can't be eaten anymore. 
For a different variation, you can fold in 8 tablespoons of chocolate chips as the last step instead of the ganache. 


I used only 3 tablespoons of chocolate powder for this. You should try 4 tablespoons for a darker more appetizing colour.

Adapted this recipe from Yoyo's kitchen adventures:

Makes ~8 silicon cup cakes

Ingredients:
1 cup all-purpose flour
2 tsp baking powder
4 tbsp cocoa powder
2 eggs
7 tbsp plain yoghurt
2 tbsp sugar
4 tbsp vegetable oil
Chocolate ganache for filling OR 8 tbsp chocolate chips for folding in

HOW:
 
1) Fill a steamer with water and bring it to boil at med-high heat. 
 
2) Sift the flour, cocoa powder and baking powder in a large bowl.
 
3) In a separate bowl, whisk the egg, sugar, yoghurt and vegetable oil together.
 
4) Add the egg mixture to the flour mixture and mix them together well without introducing too much air. Aim for less than 15 strokes and make sure there are no flour patches left. If you need more strokes, do it but at the end drop the bowl a few times on the tabletop to get rid of air bubbles. 
 
5) Fill each cupcake holder with 1 tablespoon of batter, add ganache, then top with 1 tablespoon of batter. 


If you are using chocolate chips instead of ganache, fold in the chips with a spatula.  
6) Place the cupcake holders in the  wok, cover loosely with aluminium foil. Put on the lid and steam at med-high heat for 8 minutes.

 
7) The cupcakes are cooked when a skewer comes out clean.

Tuesday, 1 July 2014

Steamed green tea cupcake with red bean filling

After baking muffins in the Airfryer for many times I have exhausted my utility and satisfaction. So I decided to go back to steaming cupcakes which I tried before and failed. This time, my third attempt, I managed to succeed.
Here goes the green tea cupcake recipe!


Taken almost entirely from Nami of justonecookbook, who is so talented and so helpful!


Makes ~7-8 silicon cupcakes

Ingredients:
  • 2 large eggs
  • 2 Tbsp. canola oil
  • 2 Tbsp. honey
  • 6 Tbsp plain regular yogurt
  • 3 Tbsp. sugar (3 is a little on the bland side. If you prefer sweeter you can use 4)
  • 1 cup all-purpose flour
  • 2 tsp. baking powder
  • 2 tsp. matcha powder
  • Sweet red bean paste

How:
 
1) Preheat a wok of water at medium high heat. 
 
2) In a large bowl, whisk eggs and oil together. 
 
3) Add yoghurt and honey and mix well. 
4) Add sugar and mix thoroughly. 
5) Sift flour and baking powder together. 
 
6) Add egg mixture to flour mixture. Mix well with spatula gently and efficiently without introducing air. Aim for less than 15 strokes. The lesser the better. If you need more strokes, do it but at the end drop the bowl a few times on the tabletop to get rid of air bubbles. 
 
6) Add matcha powder and mix well again gently without introducing air. Make sure there are no flour patches left else you will still see the flour in your cupcake after they are done.


7) Fill 1/3 of silicon cup, add your filling (about 1 teaspoonful) and top up with batter till 3/4 full. 
Note: aim for equal height of batter below and on top of filling so that the filling stays in the middle after it's done. 


8) Put into wok, cover loosely with aluminium foil to prevent condensation from lid to fall on cupcakes and put on the lid.


9) Steam for 8 min, switch off fire and check with toothpick. If it comes out clean it's done. 


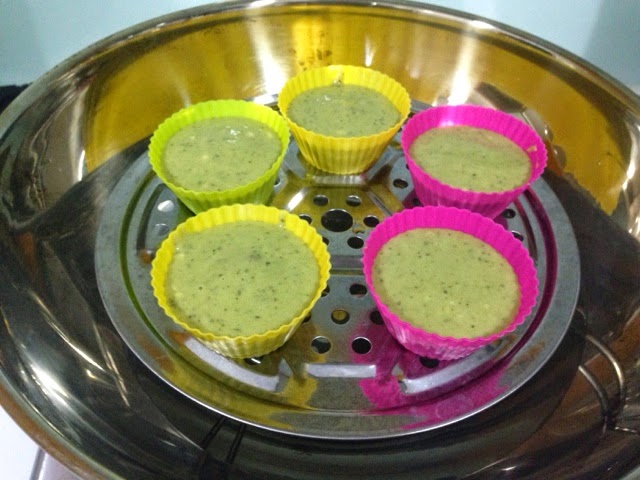
If you use fresh matcha powder the green colour will be nicer because it will be evenly green and not in patches like this. You will see this when you fold in the powder.
 

10) Remove from wok and silicon cup to cool on rack.